


Wednesday, November 12, 2008
Travelling in 3D -- A review of OnCourse Navigator 8
Posted by Don Tolson in "Pocket PC Software" @ 09:00 AM
The Advanced mode gives the user a more in-depth menu system with access to all the features available. These include:
- multi-point routes;
- saving map points as POI or Safety Camera position;
- saving routes;
- saving track logs;
- speed and camera warnings; and
- navigation to coordinates.
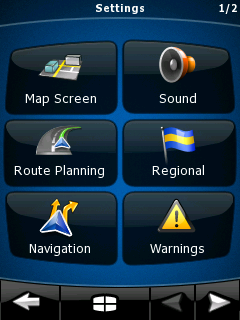
Figure 5: The main settings screen in Advanced Mode.
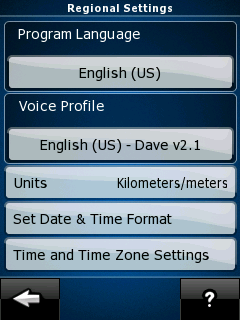
Figure 6: The Regional Settings screen. Note how the need to scroll down to get at further settings has been eliminated from this version.
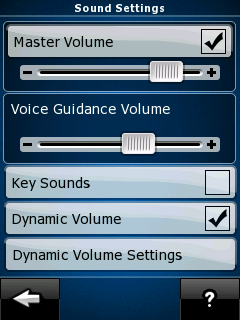
Figure 7: Sound settings. Dynamic Volume refers to tailoring the volume of announcements to the ambient noise in the vehicle at various speeds. Typically, there is more noise when traveling faster, so the announcements need to be louder.
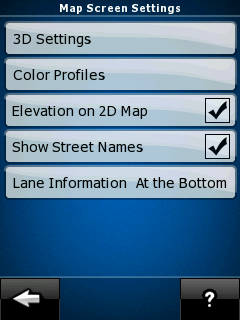
Figure 8: Map Screen settings. Here, you can configure the map/navigation screen to your preferences.
As you can see from the screens, everything is pretty much available within 2 or 3 taps which is a big advantage over OCN6. NavNGo has also made extensive changes to the Navigation screen itself in this version. There is less information shown directly on the screen than previously, but all the data is quickly available by tapping on 'active' areas/icons on the screen. It took a little while to get used to pressing on certain guages and icons to get more information in specific areas, but all the connections are very intuitive.
There has also clearly been a lot of thought put into usability and layout in both Portrait and Landscape modes. Rather than just flipping the screen onto its side, NavNGo has designed distinctly different layouts for each mode, to make best use of the available real estate.
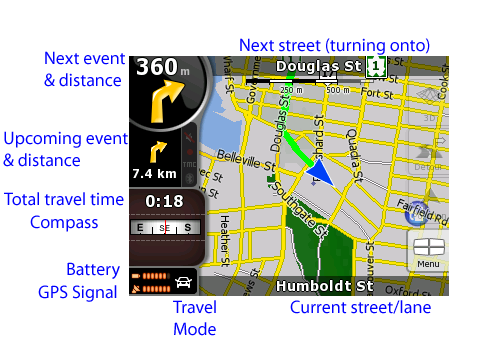
Figure 9: Here's the new navigation screen interface in Landscape mode. I've added labels to describe each of the icons shown. The big blue arrow in the centre is your current position. The thick green line is your current route.
Almost all of the icons are active and provide additional detail screens when tapped. The Menu button in the lower right takes you back to the main menu of OCN. The 'ghosted' buttons above it allow you to reset the centre of the map, define a detour from the current route, and switch to 3D display mode. You can probably only just barely see them, but just beside the Upcoming event and distance arrow (with the 7.4km underneath) are three icons to show you the status of the bluetooth connection to your GPS device; TMC channels; and volume of notifications of events. They are greyed out/dim here because none of them are active on my unit, but even when they are active -- like when you turn off the notifications -- the icons are way too small to be visible or useful.
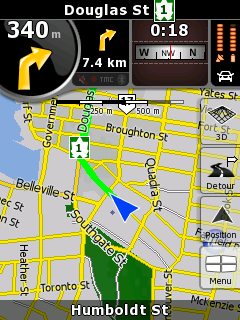
Figure 10: Here's the same navigation screen in Portrait mode. The buttons on the right side are more visible now, but will grey out after a few seconds. Notice how the Upcoming Event icon has been moved (along with everything else) up to the top of the screen. For me, I find this layout confusing because on a quick glance, it appears I have 7.4km before turning onto Douglas Street.
When traveling at night, OCN automatically switches to colours and intensity which are a little easier on the eyes in a darkened vehicle. They've softened them somewhat from OCN6 -- focusing on blues, greys and whites. You can also set the screen brightness for night operation separately from the normal day use.
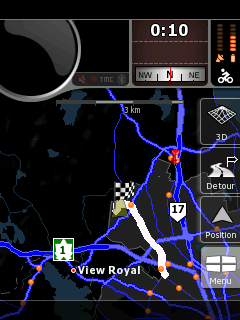
Figure 11: The navigation screen showing a full route display at night. The colours are muted, but very visible in a darkened vehicle, and you can also configure the overall screen brightness for night mode as well.
Tapping on the map itself allows you to either select a point for more information, or to set it as a destination, or if you tap and hold, a set of icons will be displayed along the bottom to zoom in and out.
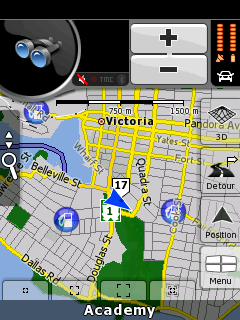
Figure 12: Zoom icons along the bottom allow you to zoom in or out to preset levels, or use the automatic 'smart zoom' feature, depending upon the distance to the next event. The +/- icons at the top allow you to zoom in as much as you like.


